How To Safely Downgrade From iOS 9 To iOS 8.4.1 Firmware
Update September 24th, 4:48 PM: This guide has been updated and works on devices running iOS 9.0 / 9.0.1 firmware.
If you are thinking to downgrade your iPhone, iPad, or iPod Touch from the new iOS 9 firmware to the older iOS 8 firmware…
Then here’s our guide for you. Consider it as a beginner-friendly tutorial as we want to make sure the “new” folks get to learn as much as possible.
If you are an advanced iOS user, feel free to jump directly to the “How To Downgrade From iOS 9 To iOS 8.4.1” part. With that said, let’s get started:
After hearing so many complaints and issues with iOS 9, many users believe downgrading their devices is the right choice.
In fact, one reader said that she bricked her device after going through the painful Slide To Upgrade problem, which is what forced us to write this tutorial.
You may want to downgrade from iOS 9 because the installation was damaged, or app crashes. Perhaps you miss the old iOS, and consider it faster and better than the new iOS 9.
Whatever the case is, downgrading iOS 9 is still possible and easy.
Shared here is a tested process that downgrades all iPhones, iPads and iPod Touches from iOS 9 to older firmware.
How come I can’t downgrade to iOS 8.3 / 8.2 or even iOS 7?
This is something we want to take a moment to explain. You can downgrade from iOS 9 to iOS 8.4.1 firmware only.
Your device cannot be downgraded to iOS 8.x and iOS 7.x firmware because that’s the way Apple has designed the system.
Every iOS firmware has this “signing” window – which is open for a x number of days. Think of it like a fresh bread prepared in a bakery (OK, that’s a very vivid picture).
When this bread gets old, you don’t eat it anymore.
Similarly, once the window is closed, Apple doesn’t want its users to get the old firmware. This is why iPhone 4 users stuck in iOS 7 cannot go back to iOS 6 (which was better than iOS 7, or so we hear).
At the time of writing this article, only iOS 8.4.1 can be signed (it’s a fresh bread).
In other words:
You can downgrade from:
- iOS 9.0 to iOS 8.4.1
- iOS 9 beta to iOS 8.4.1
- iOS 9.1 beta to IOS 8.4.1
OK, which iOS models can get downgraded?
Every iOS 9 compatible device can be downgraded to its earlier firmware. They are as follows:
- iPhone 6 Plus, 6, 5s, 5c, 5, 4s
- iPad minis, iPad Airs, iPad 2 and higher
- iPod Touch 5th and 6th gen
Do I lose any data after downgrading?
If you chose to clean install iOS 9, you will lose all your games, apps, documents, photos, etc.
However, always back up the data using iTunes or iCloud. Because when you do that, you can restore this backup at any point of time.
How To Downgrade From iOS 9 To iOS 8.4.1
The Preparation: What you need
- Latest version of iTunes player (iTunes 12.3) installed on your Windows or Mac computer
- Correct IPSW file of iOS 8.4.1. If you don’t have it yet, get it from here: Download iOS 8.4.1 IPSW files
- Turn OFF certain settings like Touch ID & Passcode and Find My Phone. To do this, go to Settings > Touch ID & Passcode and Settings > iCloud > Find My iPhone.
- Make sure you have a working USB cable / lightning connector to connect your device to your computer / laptop.
The Process: How to do it
Method 1: Using IPSW File To Downgrade iOS
Step 1: Open iTunes from your computer.
Step 2: Connect your iOS 9 device to your computer via USB cable.
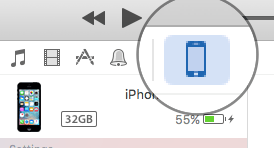
Step 3: From iTunes, go to your device and click “Summary.”
Step 4: Hold Option / Alt Key on your Mac keyboard, or left Shift Key in your Windows. Now click on the Restore iPhone button in iTunes (while holding the key).
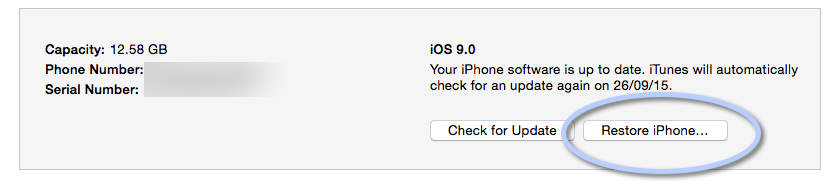
(Click on “Restore iPad…” if you are downgrading an iPad)
Step 5: This should open a new window on your iTunes player. Here is where you have to select the IPSW file you have downloaded earlier.
In the iTunes window, you will get several messages such as:
-> Extracting software…
-> Preparing iPhone / iPad for restore…
-> Restoring iPhone / iPad software…
All these are indication of a successful installation process. iTunes will notify you when the chosen IPSW file is installed on your device.
After that, you are free to unplug your iOS device.
Method 2: Using “Restore And Update” To Downgrade iOS
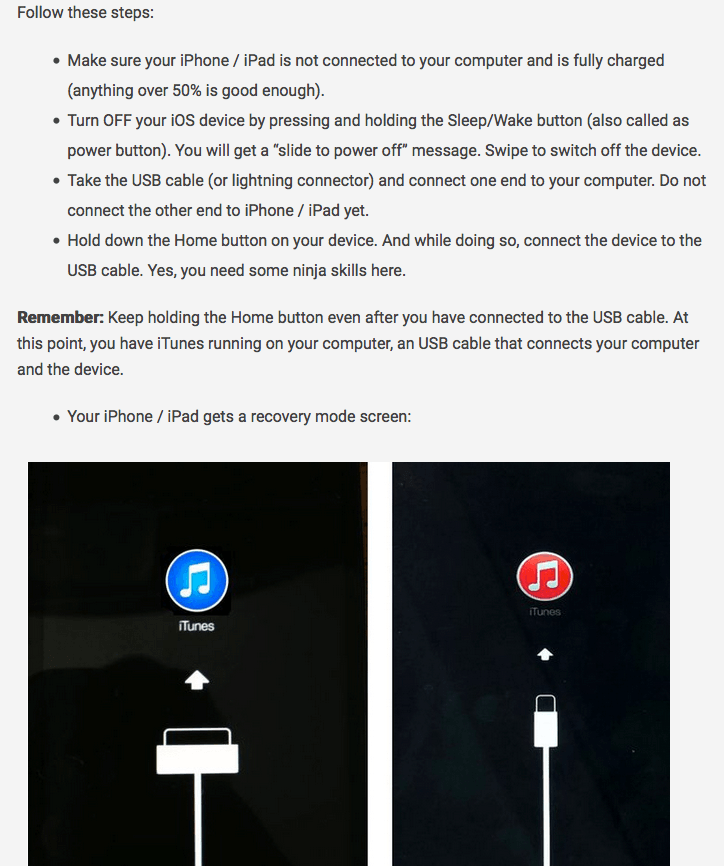
Step 1: Put your device in recovery mode by following this method:
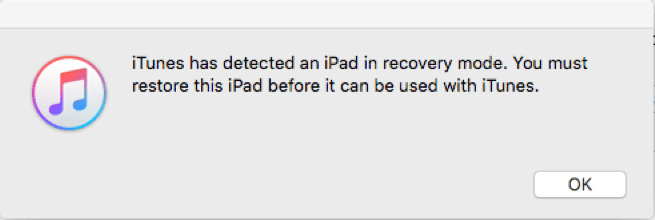
Step 2: Look into your iTunes player, which should pop up a window saying “iTunes has detected an iPad / iPhone in recovery mode.” Press OK.
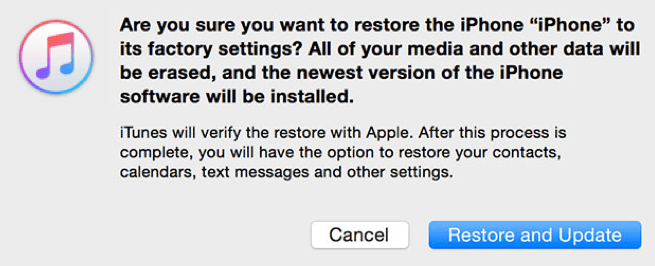
Step 3: Another iTunes window appears warning you that you are about to factory reset your iOS device and all the data will be deleted. Press “Restore and Update.” (Note: You may also get “Restore” button and “Update” button separately if you are using a different iTunes version).
Step 4: iTunes will now open iOS 8.4.1 dialog box showcasing the features of this firmware. All this happens automatically – you only have to hit the “Next” then “Agree” button to allow iTunes to download the correct iOS 8.4.1 update for your device (which is plugged into your computer).
Step 5: After iTunes downloads the iOS firmware file, the installation (downgrading) process begins. This should take about 10-15 minutes of your time.
As mentioned in method 1, iTunes will show various message at each step so you can know what’s happening. Once the process is complete, your device will have the new downgraded firmware – iOS 8.4.1, in our case.